Pipelines Tutorial
In this tutorial, you will learn how the Pipeline class acts as a connector between all the different
building blocks that are found in FARM. Whether you are using a Reader, Generator, Summarizer
or Retriever (or 2), the Pipeline class will help you build a Directed Acyclic Graph (DAG) that
determines how to route the output of one component into the input of another.
Setting Up the Environment
Let’s start by ensuring we have a GPU running to ensure decent speed in this tutorial. In Google colab, you can change to a GPU runtime in the menu:
- Runtime -> Change Runtime type -> Hardware accelerator -> GPU
You can double check whether the GPU runtime is enabled with the following command:
%%bash

nvidia-smi
To start, install the latest release of Haystack with pip along with pygraphviz:
%%bash

pip install --upgrade pip
pip install git+https://github.com/deepset-ai/haystack.git#egg=farm-haystack[colab]

apt install libgraphviz-dev
pip install pygraphviz
Logging
We configure how logging messages should be displayed and which log level should be used before importing Haystack. Example log message: INFO - haystack.utils.preprocessing - Converting data/tutorial1/218_Olenna_Tyrell.txt Default log level in basicConfig is WARNING so the explicit parameter is not necessary but can be changed easily:
import logging

logging.basicConfig(format="%(levelname)s - %(name)s -  %(message)s", level=logging.WARNING)
logging.getLogger("haystack").setLevel(logging.INFO)
Start an Elasticsearch server
You can start Elasticsearch on your local machine instance using Docker. If Docker is not readily available in your environment (eg., in Colab notebooks), then you can manually download and execute Elasticsearch from source.
# Recommended: Start Elasticsearch using Docker via the Haystack utility function
from haystack.utils import launch_es

launch_es()
Start an Elasticsearch server in Colab
If Docker is not readily available in your environment (e.g. in Colab notebooks), then you can manually download and execute Elasticsearch from source.
%%bash

wget https://artifacts.elastic.co/downloads/elasticsearch/elasticsearch-7.9.2-linux-x86_64.tar.gz -q
tar -xzf elasticsearch-7.9.2-linux-x86_64.tar.gz
chown -R daemon:daemon elasticsearch-7.9.2
sudo -u daemon -- elasticsearch-7.9.2/bin/elasticsearch -d
%%bash --bg

sudo -u daemon -- elasticsearch-7.9.2/bin/elasticsearch
Initialization
Then let’s fetch some data (in this case, pages from the Game of Thrones wiki) and prepare it so that it can
be used indexed into our DocumentStore
from haystack.utils import fetch_archive_from_http, convert_files_to_docs, clean_wiki_text

# Download and prepare data - 517 Wikipedia articles for Game of Thrones
doc_dir = "data/tutorial11"
s3_url = "https://s3.eu-central-1.amazonaws.com/deepset.ai-farm-qa/datasets/documents/wiki_gameofthrones_txt11.zip"
fetch_archive_from_http(url=s3_url, output_dir=doc_dir)

# convert files to dicts containing documents that can be indexed to our datastore
got_docs = convert_files_to_docs(dir_path=doc_dir, clean_func=clean_wiki_text, split_paragraphs=True)
Here we initialize the core components that we will be gluing together using the Pipeline class.
We have a DocumentStore, an BM25Retriever and a FARMReader.
These can be combined to create a classic Retriever-Reader pipeline that is designed
to perform Open Domain Question Answering.
import os
import time

from haystack.document_stores import ElasticsearchDocumentStore
from haystack.nodes import BM25Retriever, EmbeddingRetriever, FARMReader

# Wait 30 seconds only to be sure Elasticsearch is ready before continuing
time.sleep(30)

# Get the host where Elasticsearch is running, default to localhost
host = os.environ.get("ELASTICSEARCH_HOST", "localhost")

# Initialize DocumentStore and index documents
document_store = ElasticsearchDocumentStore(host=host)
document_store.delete_documents()
document_store.write_documents(got_docs)

# Initialize Sparse retriever
bm25_retriever = BM25Retriever(document_store=document_store)

# Initialize dense retriever
embedding_retriever = EmbeddingRetriever(
    document_store=document_store, embedding_model="sentence-transformers/multi-qa-mpnet-base-dot-v1"
)
document_store.update_embeddings(embedding_retriever, update_existing_embeddings=False)

# Initialize reader
reader = FARMReader(model_name_or_path="deepset/roberta-base-squad2")
Prebuilt Pipelines
Haystack features many prebuilt pipelines that cover common tasks.
Here we have an ExtractiveQAPipeline (the successor to the now deprecated Finder class).
from haystack.pipelines import ExtractiveQAPipeline
from haystack.utils import print_answers

# Prebuilt pipeline
p_extractive_premade = ExtractiveQAPipeline(reader=reader, retriever=bm25_retriever)
res = p_extractive_premade.run(
    query="Who is the father of Arya Stark?", params={"Retriever": {"top_k": 10}, "Reader": {"top_k": 5}}
)
print_answers(res, details="minimum")
If you want to just do the retrieval step, you can use a DocumentSearchPipeline
from haystack.pipelines import DocumentSearchPipeline
from haystack.utils import print_documents

p_retrieval = DocumentSearchPipeline(bm25_retriever)
res = p_retrieval.run(query="Who is the father of Arya Stark?", params={"Retriever": {"top_k": 10}})
print_documents(res, max_text_len=200)
Or if you want to use a Generator instead of a Reader,
you can initialize a GenerativeQAPipeline like this:
from haystack.pipelines import GenerativeQAPipeline
from haystack.nodes import RAGenerator

# We set this to True so that the document store returns document embeddings with each document
# This is needed by the Generator
document_store.return_embedding = True

# Initialize generator
rag_generator = RAGenerator()

# Generative QA
p_generator = GenerativeQAPipeline(generator=rag_generator, retriever=embedding_retriever)
res = p_generator.run(query="Who is the father of Arya Stark?", params={"Retriever": {"top_k": 10}})
print_answers(res, details="minimum")

# We are setting this to False so that in later pipelines,
# we get a cleaner printout
document_store.return_embedding = False
Haystack features prebuilt pipelines to do:
- just document search (DocumentSearchPipeline),
- document search with summarization (SearchSummarizationPipeline)
- generative QA (GenerativeQAPipeline)
- FAQ style QA (FAQPipeline)
- translated search (TranslationWrapperPipeline) To find out more about these pipelines, have a look at our documentation
With any Pipeline, whether prebuilt or custom constructed, you can save a diagram showing how all the components are connected.

# Uncomment the following to generate the images

# p_extractive_premade.draw("pipeline_extractive_premade.png")
# p_retrieval.draw("pipeline_retrieval.png")
# p_generator.draw("pipeline_generator.png")
Custom Pipelines
Now we are going to rebuild the ExtractiveQAPipelines using the generic Pipeline class.
We do this by adding the building blocks that we initialized as nodes in the graph.
from haystack.pipelines import Pipeline


# Custom built extractive QA pipeline
p_extractive = Pipeline()
p_extractive.add_node(component=bm25_retriever, name="Retriever", inputs=["Query"])
p_extractive.add_node(component=reader, name="Reader", inputs=["Retriever"])

# Now we can run it
res = p_extractive.run(
    query="Who is the father of Arya Stark?", params={"Retriever": {"top_k": 10}, "Reader": {"top_k": 5}}
)
print_answers(res, details="minimum")

# Uncomment the following to generate the pipeline image
# p_extractive.draw("pipeline_extractive.png")
Pipelines offer a very simple way to ensemble together different components.
In this example, we are going to combine the power of an EmbeddingRetriever
with the keyword based BM25Retriever.
See our
documentation to understand why
we might want to combine a dense and sparse retriever.
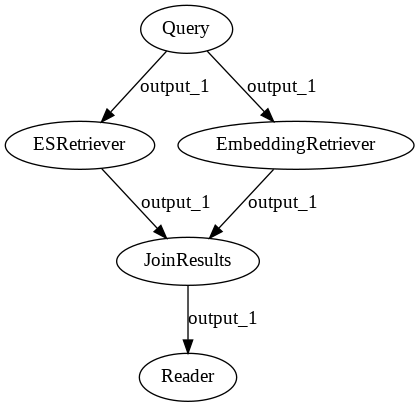
Here we use a JoinDocuments node so that the predictions from each retriever can be merged together.
from haystack.nodes import JoinDocuments

# Create ensembled pipeline
p_ensemble = Pipeline()
p_ensemble.add_node(component=bm25_retriever, name="ESRetriever", inputs=["Query"])
p_ensemble.add_node(component=embedding_retriever, name="EmbeddingRetriever", inputs=["Query"])
p_ensemble.add_node(
    component=JoinDocuments(join_mode="concatenate"), name="JoinResults", inputs=["ESRetriever", "EmbeddingRetriever"]
)
p_ensemble.add_node(component=reader, name="Reader", inputs=["JoinResults"])

# Uncomment the following to generate the pipeline image
# p_ensemble.draw("pipeline_ensemble.png")

# Run pipeline
res = p_ensemble.run(
    query="Who is the father of Arya Stark?", params={"EmbeddingRetriever": {"top_k": 5}, "ESRetriever": {"top_k": 5}}
)
print_answers(res, details="minimum")
Custom Nodes
Nodes are relatively simple objects and we encourage our users to design their own if they don’t see on that fits their use case
The only requirements are:
- Create a class that inherits
BaseComponent. - Add a method run() to your class. Add the mandatory and optional arguments it needs to process. These arguments must be passed as input to the pipeline, inside
params, or output by preceding nodes. - Add processing logic inside the run() (e.g. reformatting the query).
- Return a tuple that contains your output data (for the next node) and the name of the outgoing edge (by default “output_1” for nodes that have one output)
- Add a class attribute outgoing_edges = 1 that defines the number of output options from your node. You only need a higher number here if you have a decision node (see below).
Here we have a template for a Node:
from haystack import BaseComponent
from typing import Optional, List


class CustomNode(BaseComponent):
    outgoing_edges = 1

    def run(self, query: str, my_optional_param: Optional[int]):
        # process the inputs
        output = {"my_output": ...}
        return output, "output_1"

    def run_batch(self, queries: List[str], my_optional_param: Optional[int]):
        # process the inputs
        output = {"my_output": ...}
        return output, "output_1"
Decision Nodes
Decision Nodes help you route your data so that only certain branches of your Pipeline are run.
One popular use case for such query classifiers is routing keyword queries to Elasticsearch and questions to EmbeddingRetriever + Reader.
With this approach you keep optimal speed and simplicity for keywords while going deep with transformers when it’s most helpful.
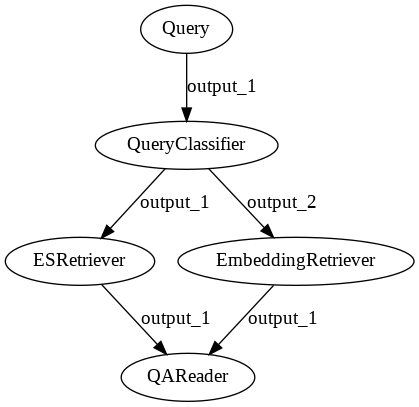
Though this looks very similar to the ensembled pipeline shown above, the key difference is that only one of the retrievers is run for each request. By contrast both retrievers are always run in the ensembled approach.
Below, we define a very naive QueryClassifier and show how to use it:
class CustomQueryClassifier(BaseComponent):
    outgoing_edges = 2

    def run(self, query: str):
        if "?" in query:
            return {}, "output_2"
        else:
            return {}, "output_1"

    def run_batch(self, queries: List[str]):
        split = {"output_1": {"queries": []}, "output_2": {"queries": []}}
        for query in queries:
            if "?" in query:
                split["output_2"]["queries"].append(query)
            else:
                split["output_1"]["queries"].append(query)

        return split, "split"


# Here we build the pipeline
p_classifier = Pipeline()
p_classifier.add_node(component=CustomQueryClassifier(), name="QueryClassifier", inputs=["Query"])
p_classifier.add_node(component=bm25_retriever, name="ESRetriever", inputs=["QueryClassifier.output_1"])
p_classifier.add_node(component=embedding_retriever, name="EmbeddingRetriever", inputs=["QueryClassifier.output_2"])
p_classifier.add_node(component=reader, name="QAReader", inputs=["ESRetriever", "EmbeddingRetriever"])
# Uncomment the following to generate the pipeline image
# p_classifier.draw("pipeline_classifier.png")

# Run only the dense retriever on the full sentence query
res_1 = p_classifier.run(query="Who is the father of Arya Stark?")
print("Embedding Retriever Results" + "\n" + "=" * 15)
print_answers(res_1)

# Run only the sparse retriever on a keyword based query
res_2 = p_classifier.run(query="Arya Stark father")
print("ES Results" + "\n" + "=" * 15)
print_answers(res_2)
Evaluation Nodes
We have also designed a set of nodes that can be used to evaluate the performance of a system. Have a look at our tutorial to get hands on with the code and learn more about Evaluation Nodes!
Debugging Pipelines
You can print out debug information from nodes in your pipelines in a few different ways.
# 1) You can set the `debug` attribute of a given node.
bm25_retriever.debug = True

# 2) You can provide `debug` as a parameter when running your pipeline
result = p_classifier.run(query="Who is the father of Arya Stark?", params={"ESRetriever": {"debug": True}})

# 3) You can provide the `debug` paramter to all nodes in your pipeline
result = p_classifier.run(query="Who is the father of Arya Stark?", params={"debug": True})

result["_debug"]
YAML Configs
A full Pipeline can be defined in a YAML file and simply loaded.
Having your pipeline available in a YAML is particularly useful
when you move between experimentation and production environments.
Just export the YAML from your notebook / IDE and import it into your production environment.
It also helps with version control of pipelines,
allows you to share your pipeline easily with colleagues,
and simplifies the configuration of pipeline parameters in production.
It consists of two main sections: you define all objects (e.g. a reader) in components and then stick them together to a pipeline in pipelines. You can also set one component to be multiple nodes of a pipeline or to be a node across multiple pipelines. It will be loaded just once in memory and therefore doesn’t hurt your resources more than actually needed.
The contents of a YAML file should look something like this:
version: '0.7'
components:    # define all the building-blocks for Pipeline
- name: MyReader       # custom-name for the component; helpful for visualization & debugging
  type: FARMReader    # Haystack Class name for the component
  params:
    no_ans_boost: -10
    model_name_or_path: deepset/roberta-base-squad2
- name: MyESRetriever
  type: BM25Retriever
  params:
    document_store: MyDocumentStore    # params can reference other components defined in the YAML
    custom_query: null
- name: MyDocumentStore
  type: ElasticsearchDocumentStore
  params:
    index: haystack_test
pipelines:    # multiple Pipelines can be defined using the components from above
- name: my_query_pipeline    # a simple extractive-qa Pipeline
  nodes:
  - name: MyESRetriever
    inputs: [Query]
  - name: MyReader
    inputs: [MyESRetriever]
To load, simply call:
yaml_pipeline = Pipeline.load_from_yaml(Path("sample.yaml"))
Conclusion
The possibilities are endless with the Pipeline class and we hope that this tutorial will inspire you
to build custom pipeplines that really work for your use case!
About us
This Haystack notebook was made with love by deepset in Berlin, Germany
We bring NLP to the industry via open source!
Our focus: Industry specific language models & large scale QA systems.
Some of our other work:
Get in touch: Twitter | LinkedIn | Discord | GitHub Discussions | Website
By the way: we’re hiring!